Translate

Saturday, August 8, 2015

Hand Sewn Fabric Flowers How To

Okay so this is how I made my last batch of hand sewn fabric flowers. 

I used a Geometry compass or whatever to measure as large of a circle as I was comfortable with, for the purpose in which I intend to use these fabric flowers, which is as hair barrettes. I decreased the radius on the compass to get a smaller circle, until I had four circles ranging from large to small. I cut these out on felt cloth to use as a gauge when cutting out fabrics for my fabric hair flowers. 


Below is a photo of the fabric circles I cut using my felt circles as a guide...


I'm planning on making an insane amount of fabric flowers, but I digress...


This is a stack of felt circles to be used on the back of the fabric hair flowers, for purposes of stabilization. These are all the same size as my smallest felt circle, in the first photo in this post.


Okay. Step one. Begin with the largest pile of fabric circles. Using one piece of fabric at a time, fold in half, and then fold in half again. Thread through the center of your felt circle...


Tie a double knot in the back, like so. Don't worry about how the felt circle looks in the back because when we're all done, we're going to use a piece of the same fabric we're using for the flower to cover the felt.


Since I have four stacks of four fabric circles, I will begin to add all four of my largest pieces, one at a time, to create the foundation of my flower. Each circle of fabric should be folded in half twice, so that it will look more or less like this:


It's not looking perfect, but it doesn't have to. Especially not at this point. Here's the completed first layer of fabric petals:


Repeat the process with your second largest fabric circles. Here's my second layer...


For your third layer, continue the process of folding your fabric circles in half twice, using the next smallest pile of fabric circles, and focusing on creating one flower petal at a time. 


And finally, with your remaining fabric circles, which should be the smallest ones, repeat the process. You can move the fabric around as you see fit, securing with your needle and thread as you go along. 


When you're done you can add a piece of fabric to the back of the flower to cover the felt. I sewed mine on. 

Then use a glue gun or whatever fabric/jewelry glue you prefer to secure a hair barrette or clip to the back. Let it dry, and you're all done!

Have fun 😊

DeniseDoesCouture: Hand sewn Fabric Hair Flowers, Painting, Crafterno...

DeniseDoesCouture: Hand sewn Fabric Hair Flowers, Painting, Crafterno...: These are some hand sewn fabric hair flowers I made yesterday using a different technique than usual: *four stacks of different sized fabric...

Hand sewn Fabric Hair Flowers, Painting, Crafternoon, and YouTube crazies

These are some hand sewn fabric hair flowers I made yesterday using a different technique than usual:

*four stacks of different sized fabric circles (I had four pieces of fabric per stack) I didn't measure exactly, I just cut four different sized circles.
*a round half-dollar sized piece of felt fabric
*needle and thread (don't poke yourself a million times like I did :( though)

~ starting with your largest stack of round fabric, fold one piece of fabric in half, and then in half again. It will be in the shape of like a slice of pizza. Lay it flat on your felt with the pointy end touching the center of the round piece of felt. Sew it in place with your needle and thread. Continue with the three remaining pieces of your largest fabric circles. 
~ next you will repeat this process with your second largest stack of fabric circles. This will create a second layer, which will go on top of the initial layer. Then repeat with your third largest fabric circles, to create a third layer on your flower, and finally, using your smallest circles, thread those through just like you did all the other layers, to create the fourth and final layer of your flower. I'll take some photos today of the step by step process. That should be helpful if you're more of a visual learner. 


A rabbit silhouette painting I finished up yesterday....


I'm going to be sewing more hair flowers today, doing some painting, enjoying a Saturday Crafternoon, Chromecasting Pandora Internet Radio, and pretty much just see where the day takes me. 

Part of my plans for today also include painting a Fleur de Lis. So, Yesterday I looked on YouTube for "How to draw a Fleur De Lis" & found a video by a crazy man. He rants it's "The Devil's Flower" for 35min. My Little Pony is also "demonic, evil", because one of the ponies has a fleur de lis symbol, and I don't
know what he has against Mary, but he calls her Lucifer's mom or something, I don't even know. It was kind of funny at first but then I realized he's like delusional and stuff and then it just got creepy. So yeah. Be careful out there!!! http://t.co/yJxMHzBVRS

Friday, August 7, 2015

New Paintings in my Etsy shop

I just added these paintings to my Etsy shop. Check it out:

This dark teal and red abstract painting has great texture, as you can see from the angled photograph. I dig it.


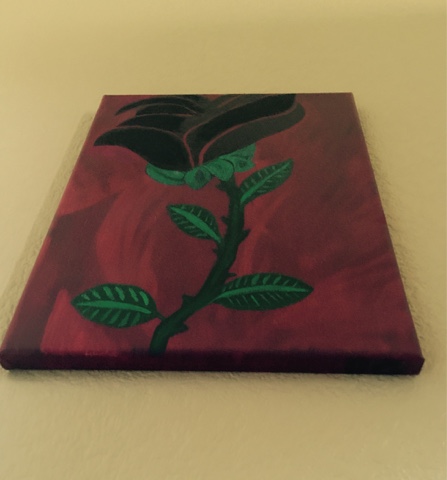
I'm not sure why, but this black flower over a dark dimensional red background reminds me of the Queen of Hearts.


This last one is my absolute favorite. I love the way the colors compliment each other in this abstract piece. Also, it has a whimsical quality to it, and I'm all about the whimsical.

Tuesday, August 4, 2015

I can't stop painting

Here are some of my new paintings!

This was supposed to be a black rose but after hours of difficulty in painting a rose, I just let go of the idea and let my mind wander and allowed the painting to go to where it just felt right.


A golden Egyptian kitten

Dark Blue Abstract Painting 


Pink Abstract Painting 

Octopus Painting 


Frog on a Lily Pad Painting 


There are quite a few more but I'm having trouble photographing them. I'll be sure to show them off as soon as I do though!

Here's a video clip I took of my backyard art gallery yesterday, just after applying clear acrylic sealer onto my paintings. You can see a few of the paintings I was unable to photograph: